Introduction
Friday, August 30, 2002
In this topic, I'll show you how to create menues with icons that look like the ones in the new Visual Studio IDE. This continues the discussion in the previous topic (Actions): the menues created here will be based on (not technically) the CActionMenu class. Also, both NActions and CAction will be extended (again, not technically) to incorporate icons.
On the download page, get the UICore project, which contains everything discussed in this and the previous topics.
Preparation
Class NActions
This class gets new constructors that allow to associate an image list. Also, when CAction objects are added, we'll make sure they know about this collection so they can talk to the image list:
Private m_ImageList As WinForms.ImageList

Public Overloads Sub New(ByVal il As WinForms.ImageList)
	MyBase.New
	m_ImageList = il
End Sub

' ...

Public Overloads Sub Add(ByVal action As CAction)
	If MyBase.BaseGet(action.Caption) Is Nothing Then
			MyBase.BaseAdd(action.Caption, action)
			action.SetActionList(Me)
		Else
			Throw New ArgumentException
	End If
End Sub

' ...

Public Property ImageList As WinForms.ImageList
	Get
		Return m_ImageList
	End Get
	Set
		m_ImageList = value
	End Set
End Property
Class CAction
This class will get a reference to the NActions collection. The constructors will get a new buddy that takes an image index (note that all other constructors should initialize the image index to negative one).
Private m_ActionList As NActions
Private m_Image As Integer

' ...

Public Overloads Sub New(ByVal sText As String, ByVal sHint As String, ByVal execHandler As DExecHandler, ByVal hintHandler As DHintHandler, ByVal iImage As Integer)
	m_Text = sText
	m_Hint = sHint
	m_ExecHandler = execHandler
	m_HintHandler = HintHandler
	If iImage < -1 Then Throw New ArgumentException
	m_Image = iImage
End Sub

' ...

Public ReadOnly Property ActionList As NActions
	Get
		Return m_ActionList
	End Get
End Property
Friend Sub SetActionList(ByVal al As NActions)
	m_ActionList = al
End Sub
CActionMenu class
Since CActionMenu is derived from MenuItem, we can override a couple of event-raiser subs that are fired when each menu item is drawn, provided the OwnerDraw property is set to True. We'll tell Windows that we want to draw our own menu items in the constructor. Note that top-level menues (like "File", or "Edit") do not get owner-drawn, so it's up to the user of this class to pass a flag:
Public Overloads Sub New(ByVal action As CAction, ByVal fOwnerDraw As Boolean)
	MyBase.New
	MyBase.Text = action.Caption
	MyBase.Enabled = action.Enabled
	m_Action = action
	m_Action.AddStatusHandler(AddressOf Me.HandleStatus)
	Me.OwnerDraw = fOwnerDraw
End Sub

' ...
When the user presses a top-level menu, the system will first ask for the size of each owner-drawn menu item. We'll measure the string used for the caption, and add a few pixels for the icon:
Protected Overrides Sub OnMeasureItem(ByVal e As System.WinForms.MeasureItemEventArgs)
	If Me.Action.Caption = "-" Then
				e.ItemHeight = 5
		Else
				e.ItemHeight = 20
	End If
	Dim fs As FontStyle
	If Me.DefaultItem = True Then fs = fs BitOr FontStyle.Bold
	Dim fnt As New Font("Tahoma", 8, fs)
	Dim sf As SizeF = e.Graphics.MeasureString(Me.Action.Caption, fnt)
	fnt.Dispose
	e.ItemWidth = CInt(sf.Width) + 20	' leave room for icon
End Sub
After the system knows the size, our base class will fire the following protected sub, in which the actual drawing is done. We get a reference to a Graphics object that has all of the methods we need, and there's a rectangle member (Bounds property) in the event argument instance, too. We check for the state of the menu item (default item? enabled? selected?) to carry out our paint job accordingly.
Mihai Cvasnievschi suggested a method for the "hover" effect that on menu icons (new in VS7), as well as better color combinations and some other corrections (note that the screen shot at the bottom is still my old mess). Thanks a lot, Mihai!
Protected Overrides Sub OnDrawItem(ByVal e As System.WinForms.DrawItemEventArgs)
	' colors, fonts
	Dim clrBgIcon, clrBgText, clrText As Color, fs As FontStyle, fnt As Font
	Dim b As SolidBrush, p As Pen
	Dim fEnabled As Boolean = Not CType(e.State BitAnd DrawItemState.Disabled, Boolean)
	Dim fSelected As Boolean = CType(e.State BitAnd DrawItemState.Selected, Boolean)
	Dim fDefault As Boolean = CType(e.State BitAnd DrawItemState.Default, Boolean)
	Dim fBreak As Boolean = (Me.Action.Caption = "-")
	If fEnabled And fSelected And Not fBreak Then
            clrBgIcon = Color.FromARGB(182, 189, 210)
            clrBgText = Color.FromARGB(182, 189, 210)
            clrText = Color.Black
            fs = fs BitOr FontStyle.Regular
		Else
            clrBgIcon = Color.FromARGB(219, 216, 209)
            clrBgText = Color.FromARGB(249, 248, 247)
            clrText = Color.Black
	End If
	If Not fEnabled Then
            clrText = Color.Gray
	End If
	If fDefault Then
		fs = fs BitOr FontStyle.Bold
	End If
	fnt = New Font("Tahoma", 8, fs)
	' total background (partly to remain for icon)
	b = New SolidBrush(clrBgIcon)
	e.Graphics.FillRegion(b, New [Region](e.Bounds))
	b.Dispose
	' icon?
	If Not Me.Action.ActionList Is Nothing Then
		Dim il As ImageList = Me.Action.ActionList.ImageList
		If Not il Is Nothing Then
			Dim index As Integer = Me.Action.Image
			If index > -1 And index < il.Images.Count Then
				Dim rect As Rectangle = e.Bounds
				With rect
                        .X += 4
                        .Y += 2
                        .Width = 16
                        .Height = 16
				End With
				If fEnabled = False Or fEnabled And fSelected Then
					Dim cp As New ControlPaint
					cp.DrawImageDisabled(e.Graphics, il.Images.Item(index), rect.X, rect.Y, clrBgIcon)
				End If
				If fSelected Then
					rect.X -= 1
					rect.Y -= 1
				End If
				If fEnabled Then
					e.Graphics.DrawImage(il.Images.Item(index), rect)
				End If
			End If
		End If
	End If
	' text background
	Dim rf As RectangleF
	With rf
            .X = 24
            .Y = e.Bounds.Y
            .Width = e.Bounds.Width - .X
            .Height = e.Bounds.Height
	End With
	b = New SolidBrush(clrBgText)
	e.Graphics.FillRegion(b, New [Region](rf))
	b.Dispose
	' text/line
	rf.Y += 3 : rf.Height -= 3
	If Not fBreak Then
				b = New SolidBrush(clrText)
				Dim sf As New StringFormat
				sf.HotkeyPrefix = Drawing.Text.HotkeyPrefix.Show
				e.Graphics.DrawString(Me.Action.Caption, fnt, b, rf, sf)
				fnt.Dispose
				b.Dispose
		Else
				p = New Pen(Color.Black)
				rf.Y -= 1
				e.Graphics.DrawLine(p, rf.X, rf.Y, rf.Right, rf.Y)
				p.Dispose
	End If
	' border
	If fEnabled And fSelected And Not fBreak Then
            p = New Pen(Color.FromARGB(10, 36, 106))
		e.Graphics.DrawRectangle(p, e.Bounds)
		p.Dispose
	End If
End Sub
Note that we access the image index saved in the CAction object, and we get a reference to the image list the same way. Remember to dispose of fonts, pens, and brushes to save system ressources. Also, this code isn't so generic: you could create a CMenu class (deriving from MainMenu) and add properties for fonts and colors to it (and access the instance via the Parent property of this class's base).
Client-side code
Here's what the client needs to do:
' create image list
Dim ilStandard As New ImageList
ilStandard.TransparentColor = Color.Silver
With ilStandard.Images
	Dim sFolder As String = "C:\Pictures\"
	.Add(New Bitmap(sFolder & "Open.bmp"))
	.Add(New Bitmap(sFolder & "Save.bmp"))
End With
' action list
m_Actions = New NActions(ilStandard)
' add actions (note the image index)
m_Actions.Add("File", "Contains commands for working with files", Nothing, AddressOf Me.HandleHint)
m_Actions.Add("Open ...", "Opens a file", AddressOf Me.HandleAction, AddressOf Me.HandleHint, 0)
m_Actions.Add("Save", "Saves the file", AddressOf Me.HandleAction, AddressOf Me.HandleHint, 1)
'the menu
Me.Menu = New MainMenu
With Me.Menu.MenuItems
	.Add(New CActionMenu(m_Actions("File")))
	With .Item(.Count - 1).MenuItems
		.Add(New CActionMenu(m_Actions("Open ..."), True))
		.Add(New CActionMenu(m_Actions("Save"), True))
	End With
End With
What it should look like
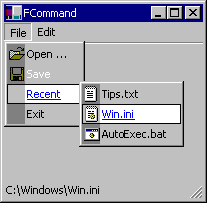 This is a screenshot from an example program (a little more complex - it does not
correspond to the above client-side code). Note that our CActionMenu class can be
used for context menues as well as toolbar button menus, too. The "Save" item is
disabled. And, of course, you can adjust colors to your heart's content. The code
to draw the file icons displayed in the "Recent" menu is not available in the
accompanying download.
This is a screenshot from an example program (a little more complex - it does not
correspond to the above client-side code). Note that our CActionMenu class can be
used for context menues as well as toolbar button menus, too. The "Save" item is
disabled. And, of course, you can adjust colors to your heart's content. The code
to draw the file icons displayed in the "Recent" menu is not available in the
accompanying download.